아이콘은 텍스트를 분리하여 훨씬 더 이해하기 쉽게 만듭니다. 아이콘은 간단하지만 프레젠테이션을 놀라운 것으로 만듭니다. 매력적인 디자인으로 이미지를 표시하려면 특정 모양에 맞게 가리기를 할 수 있습니다.
먼저 Inkscape나 Adobe Illustrator와 같은 벡터 그래픽 소프트웨어에서 아이콘을 만들고 WMF 형식으로 저장해야 합니다. 또한 인터넷에서 SVG 형식의 아이콘을 다운로드하고 온라인 변환기를 사용하여 WMF로 변환할 수 있습니다.
WMF 파일을 Google 드라이브에 업로드하고, 파일을 마우스 오른쪽 버튼으로클릭한 후 다음으로열기 를 클릭한 후 Google Drawings 를 선택합니다.
Google Drawings에서 열면 아이콘을 선택하고 Google 슬라이드에 복사하여 붙여넣습니다.
Google 슬라이드에서 기본 모양과 마찬가지로 크기를 조정하고 색상을 변경할 수 있습니다.
{
“@context”: “http://schema.org”,
“@type”: “VideoObject”,
“name”: “How do you create editable icons to use in Google Slides?”,
“description”: “First, you have to create your icon in a vector graphics software such as Inkscape or Adobe Illustrator and save it in WMF format. You can also download icons in SVG format on the Internet and convert them to WMF using an online converter. Upload the WMF file to Google Drive, right-click the file and click Open with, then choose Google Drawings. Once it opens in Google Drawings, select the icon and copy-paste it into Google Slides. You’ll be able to resize and recolor it just like with any native shape in Google Slides. #GoogleSlides #Presentation #Tutorial You can download the design used in this tutorial and more free PowerPoint templates and Google Slides themes at https://www.slidescarnival.com”,
“thumbnailUrl”: “https://i.ytimg.com/vi/iXCkK7Y7l4E/default.jpg”,
“uploadDate”: “2020-03-10T12:35:47.000Z”,
“duration”: “PT1M8S”,
“embedUrl”: “https://www.youtube.com/embed/iXCkK7Y7l4E”,
“interactionCount”: “11”
}
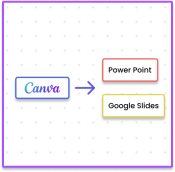
Add dynamic GIF's, captivating videos, and stylish photo frames directly from Canva's royalty-free asset library effortlessly. Share or export anywhere, be it PPT or Google Slides.