魅力的なデザインで画像を表示したい場合は、特定の形に合わせてマスクすることができます。
- 自然を基にしたテンプレートや注意を引く必要がないテンプレートを探している場合、茶色も優れています。
- 茶色のプレゼンテーションテンプレートの例 上部の「トリミング」の隣にある「ダウン」矢印をクリックします。
- 使いやすいタイムライン、チャート、グラフ
- あなたの形状はあなたの画像をマスクします。 使用する写真をオンラインで検索している場合は、結果をフィルタリングして最大のものだけを表示できます。
Search
Trends

魅力的なデザインで画像を表示したい場合は、特定の形に合わせてマスクすることができます。
Add dynamic GIF's, captivating videos, and stylish photo frames directly from Canva's royalty-free asset library effortlessly. Share or export anywhere, be it PPT or Google Slides.
Start editing for free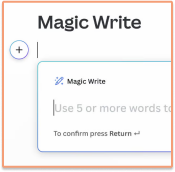
Go from idea to your first draft *in seconds with Magic Write, our content generation tool powered by OpenAI.
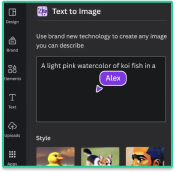
Dream it up, then add it to your design. Watch your words and phrases transform into beautiful images.

Click to remove image backgrounds, perfect for product photos, headshots, or transparent PNGs.
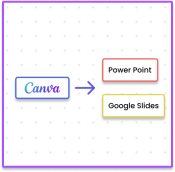
Canva allows you to export to a perfect PPT or Google Slide when you are done.